 SANS10400-Building Regulations South Africa SANS10400 are the Building regulations in South Africa, and both international and national standards, are fundamental to successful building and construction projects, both big and small.
How to Build Your Own Pergola
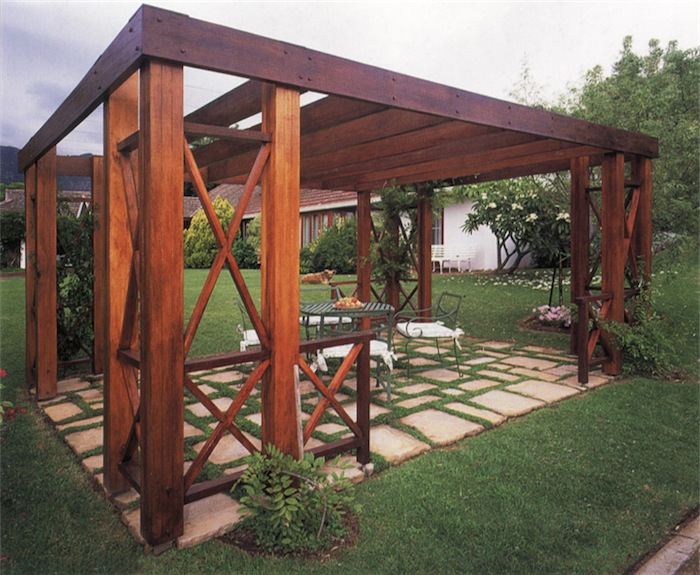
This carefully designed, beautifully constructed wooden pergola looks rather grand and imposing. However, while it is certainly a relatively large-scale project, involving a fair amount of timber, there are no complicated joints, and you won’t need any specialised tools.
You can simplify the project even further by buying ready-planed timber that has been cut to size. Use the sizes given in our materials list as a guide, but buy the closest dimensions if these are not available. Bear in mind that conversions from metric to imperial measurements will never be exact. If in doubt, rather buy wood that is slightly longer than required. Also remember that the dimensions of off-the-shelf rough timber are greater than timber that comes ready planed.
>
>
Materials Required to Build the Wooden Pergola
For the concrete:
- 3 bags cement (150 kg or 330 lbs)
- 6 wheelbarrows sand (40 litres x 6 or at least 50 gallons)
- 6 wheelbarrows crushed stone (19 mm or ¾ in is ideal) or gravel
Upright posts:
- 24 x 144 mm x 69 mm (5¾ ins x 2¾ ins) x 2,4 m (7.8 ft) glued in pairs to make them thicker
- 4 x 144 mm x 69 mm x 770 mm (30 ins)
Note that if you are going to concrete the posts into the ground, they will need to be at least 500 mm (or about 2 ft) longer, and you will need extra concrete for the footings.
Rails:
- 4 x 69 mm x 44 mm (2¾ ins x 1¾ ins) x 550 mm (22 ins)
- 28 x 69 mm x 44 mm (2¾ ins x 1¾ ins) x 500 mm (22 ins)
Planed timber crosspieces:
- 16 x 44 mm x 32 mm (1¾ ins x 1¼ ins) x 1,2 m (about 4 ft)
- 24 x 44 mm x 32 mm (1¾ ins x 1¼ ins) x 760 mm (about 30 ins)
Beams:
- 2 x 220 mm x 44 mm (8¾ ins x 1¾ ins) x 5 m (16.4 ft)
- 9 x 220 mm x 44 mm (8¾ ins x 1¾ ins) x 3,5 m (11½ ft)
Post anchor supports:
- 12 x heavy-duty post anchor shoes
- 4 x lightweight post anchor shoes
Fasteners:
- 24 x 150 mm (6 in) x 10 mm (1/3 in) hexagonal bolts with washers
- 60 x 100 mm (4 in) x 8 mm (¼ in) coach screws
- 50 mm (2 in) oval wire nails
Exterior wood glue
Exterior wood sealer
Tools Required to Build the Wooden Pergola
- Spades and shovels for digging the footing and mixing concrete
- Tenon saw to cut the timber
- Circular saw (optional)
- Electric router to cut a groove in the upright posts before they are joined in pairs
- Mitre box to mitre the ends of four of the beams and to cut the diagonal timber both above and below the railing
- Chisel to make housings in the diagonal lengths of timber (to form the criss-cross pattern)
- Carpenter’s square to accurately measure wood to be cut
- Clamps to hold the uprights lengths of wood together while you glue them in pairs
- Electric drill with suitable wood bits to make holes for screws and bolts
- Spanners to tighten the screws and bolts
- Hammer to secure the nails
- Paint brush to seal the wood
How to Build a Wooden Pergola for your Garden
 The first step is to set out the structure accurately to ensure that all the upright posts are correctly positioned. This is vital, since if you are even a few inches out, the beams are not going to fit. If they are spaced too widely, you will have a real problem!
You can throw a concrete slab at each corner of the structure and, once it has set and hardened, you can bolt post anchor brackets to the concrete, and then bolt these to the posts. Alternatively you can use anchor brackets that are designed to be concreted into the ground. Either way, you will need to mix the cement, sand and stone together with sufficient water to make a nice pliable mix that is easy to handle. Make sure it is not too runny, or you will lose strength.
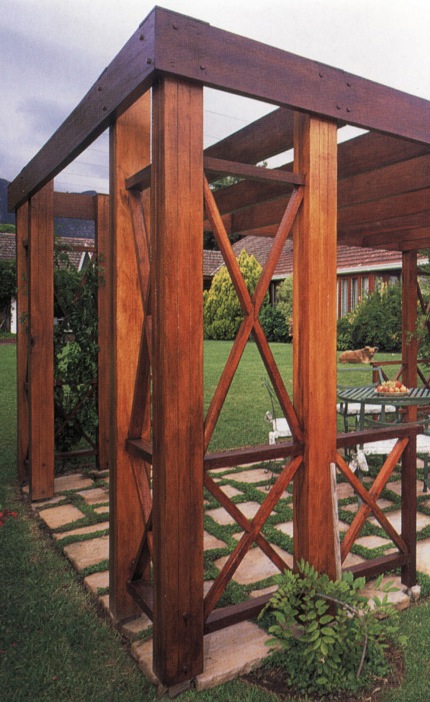
Use the router to cut a 69 mm (2¾ in) groove vertically in each of the 24 upright posts, where the two pieces will be joined. This will not only look attractive, but it will also create the visual impression that the rails have been inserted right through the posts, making the structure look even more solid than it is.
Note that if a variance of the 144 mm x 69 mm timber specified is used for the upright posts, the groove should match the smaller dimension of the wood.
Now glue the posts in pairs and bolt them into position. Use clamps to keep the timber together and brace it so that it stays upright. You may need to do two or three posts at a time, depending on the number of clamps you have available. Allow sufficient time for the wood glue to dry, before moving onto the next set.
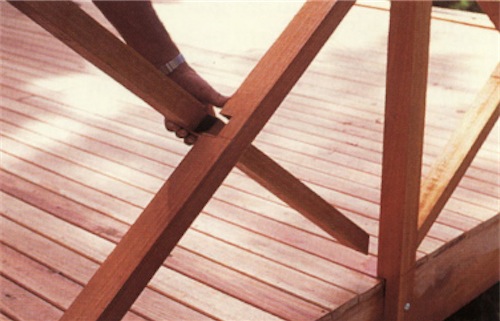 While you wait for the wood glue to dry, nail the diagonals in place. You will first have to cut the ends of each of these at an angle. Use your mitre box and saw to do this. To achieve the criss-cross effect, you need to join the two diagonals with a cross halving joint. Use the tenon saw to cut the joint, and the chisel to create a 32 mm x 22 mm (1¼ in x ¾ in) slot in the centre of each length of timber. Note that the 32 mm x 22 mm dimension is in keeping with the size of the timber specified (32 mm x 44 mm). If you opt for a different size, however slight, adapt the dimensions accordingly.
 It is a good idea to glue the joints before skew nailing the ends to the posts.
Also pre-drill the wood for the nails and coach screws to prevent it from splitting.
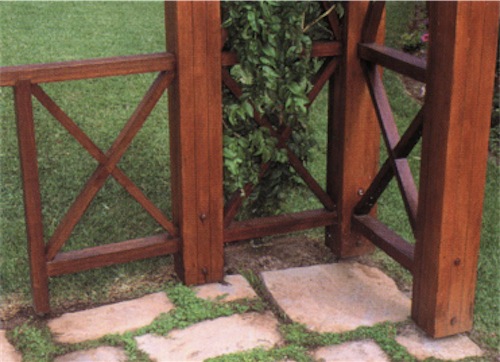
Once the diagonals are in position, skew-nail the railings in place.
Now mitre the ends of the four outside beams that form a frame for your pergola “roof”. This will ensure that the ends meet neatly at the corners. Fix the two longer beams in place first, using coach screws to secure them. Then measure and mark the position of all the shorter beams Bolt the two outer beams with two coach screws at each end, where they meet the long beam. Then bolt the inside beams, ensuring that they are evenly spaced.
Subject:
carports with approved plan
Message:
Good day can you please assist us with a carports plan for a complex with 60 units,761 prosperity road, groblerpark,roodepoort.you can also give us a wite on carports together with plan
Hi Motlatjo, We are not a carport company and we do not do any construction work at all.
Thank you for this Pergola article. Easy to follow – very helpful – and a good looking end product.
Hi,
Will I need the municipality to approve a pergola if its attached to the house?
Thanks
Not if it is just a pergola Neil. See Minor Building Work.
Hi
Can you help with plans for a patio?
Thank you
Subject:
Minor Building
Message:
Hi,
Love your website. We have an existing carport structure (uprights and cross beams without roof sheeting), which, as you know, under the present planning laws, is classified as a pergola, not requiring
plans. We’re considering adding additional cross beams. What would the minimum cross beam centre’s be before our pergola was considered a carport?
Kind regards,
Hi Bruce, This is a good question. The law states a solid covering ie. roof sheeting of any sort, but if there are slats that permanently allow a certain percent of light through then that should not be a solid cover. On the other hand plans were required a while ago when a house was sold in KZN and the back verandah had an aluminium louvre shutter covering that could be opened or closed with a lever. They considered this a “solid” covering and “as built” plans had to be submitted before the sale of the house could go through. It would seem to be how each inspector does his/her interpretation of the laws.
We are not a construction company or a design firm please contact a reliable contractor who will help you. Try the Master Builders SA.
Hi,
I wish to build a pergola over my stoep.If i decide to cover it at a later stage,do i need plans if i had to cover it with polycarbonate sheeting?why does the law allow a pergola with alluminum shutter as roof covering without plan?Jeffreysbay
Any solid roof covering will need approval from the council whether this is for full plans or approval as “minor building work”. Aluminium is not an exeption, my mother sold her house in Howick Natal recently and they made her submit plans for the aluminium shutter roof over her back stoep. She was told by the aluminium shutter supplier that she did not need plans, this was so wrong as the company might not have got the sale if she had known. Buyer beware of false claims by sellers who want to make a sale.
Good morning,
What an helpful site! Thank you.
Should I build such a pergola, attached to my home, and install retractable canvass awnings, would that alter the position as to the necessity for building plans?
Regards
Hi
Thank you for all the advice. Got a new question. If I want to put pollicarb over the pergola would I need plans? What would be the biggest I can go without plans
If the structure is regarded as minor building work you won’t require plans. See this article for more information.
The only thing that will affect the need for plans is whether or not it is considered to be minor building work.